Tips For Using Pre-stretched Canvas.
For those of you — like me — that prefer to purchase your canvas pre-stretched rather than stretching your own (and if you're like me, it's because you're lazy), here are a few tips for preparing a canvas for paint...
1) Fixing a loose or sagging canvas.
This is an issue I often run into purchasing pre-stretched canvas. The canvas isn't stretched as tight as I'd prefer, or it's downright loose and wavy. To correct this problem, there are a number of "tricks" from which I often achieve good results.
The simplest way to tighten a pre-stretched canvas is to shrink it. First I place the canvas on my easel with the back of the canvas facing me. I then use a spray bottle filled with warm water to evenly mist the back of the canvas. The key here is to only dampen the canvas, not soak it. Once I've finished misting, I immediately begin drying the canvas with a hair drier. When the canvas is dry, I check to see if it's as tight as I like and to make sure there are no longer any wrinkles or waves in the canvas. If there are, I repeat the process. You can also "spot-shrink" the canvas. If you find the canvas is overall as tight as you'd like, but there is a wave near a corner, you can mist only the wave or wrinkled area and dry with a hair drier.
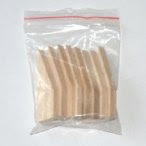
 The next solution for tightening a loose canvas is to use canvas keys (or tightening keys). Have you ever wondered what those little wedges of wood or plastic are that came with your pre-stretched canvas? Well, now you know. Most manufactures of pre-stretched canvas do include canvas keys (especially with larger canvas).
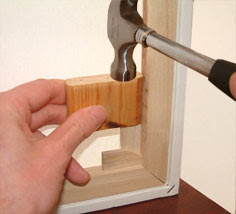
 To tighten the canvas, you simply insert a key into each slot located in the corners of the stretcher bars then lightly tap them into place until the canvas is taught. It doesn't take too much force, and you'll want to be careful not to split the wood of the stretcher bars. I've found canvas keys
especially useful for larger paintings that have been hanging for several years and have relaxed over time.
2) Toning a pre-stretched canvas
Toning a canvas is most often an artistic choice for the artist. Its main purpose is to provide an underlying color that helps unify the completed painting. But here I suggest toning for its practical benefits.
I typically tone my canvas using either a neutral color (like gray), or as is most often the case, a sepia tone (mixed using burnt sienna and ultramarine). I thin the mixture to an ink-like consistency. Liquin is the medium I use to thin the paint — and this is the key. Using Liquin (which is an alkyd resin) serves two main purposes, first it creates an extremely durable ground on which to apply your paint. And second, its slightly slick finish increases paint adherence giving your paint better covering power.
Unlike thinning paint using a solvent such as mineral spirits or turpentine (or any painting medium that includes a solvent), which serve to breakdown the paint's ability to bind with the surface, Liquin dramatically increases the paint's binding power.
Note: Although Liquin is a great choice for thinning paint for toning a canvas, increasing drying time or increasing paint flow, absolutely do not use it to varnish a painting. Using Liquin as a varnish may look great, but the purpose of varnish is to place a protective, REMOVABLE layer over the paint. Liquin is not removable and it doesn’t allow the paint to breath. There currently are no known solvents that can safely remove Liquin from a painting’s surface.
I hope you found my first ‘Tips’ entry useful.
Happy painting!
