2009 was a good but sometimes difficult year for me (as most are).
It began in the midst of the greatest recession America has seen since the Great Depression and I was wary of how it might affect art buyers and their ability to purchase new work. As it turned out, the shows — at least for me — went well and I not only sold paintings to previous buyers of my work, but I managed to pick up a few new collectors as well.
By the time summer rolled around, the recession seemed to be easing up a bit and I was still selling work through galleries and directly from my studio. This turned out to be a true blessing because at the end of August, my wife was laid off from her job.
Like many artists out there in the early stages of their career, my income isn't as consistent as it needs to be to survive as a single-income household, so the loss of my wife's job brought much stress and fear about how we would manage financially. Thankfully, my sales continued and we really didn't experience any financial difficulties from her no longer working.
We did however, have to miss out on some painting trips we'd planned (and were very much looking forward to), including missing the Western Visions Show at the National Museum of Wildlife Art in Jackson, Wyoming. A consolation trip to Rocky Mountain National Park for a week at the end of September helped ease our disappointment a bit — and I did pick up some nice reference material. If everything goes well, we’ll reschedule those trips for the coming year.
A few of the highlights from this year included conducting an oil painting workshop in Nebraska, speaking in front of the Gilbert Visual Arts League (a local art group here in Gilbert, AZ) as well as judging their annual art show. And, being invited to participate in a show in Tulsa, Oklahoma. I had tried to get into NatureWorks several times before and had previously been denied. I’m really excited about attending this show but it has definitely added to my workload. So goes the difficult life of an artist.
Since the trip in September, I've been working hard at producing new paintings for the coming show season and to replace older work in galleries. My wife is still out of work, but it looks like that will be ending with the start of the new year — she's very excited.
All-in-all the year was productive, rewarding and sometimes stressful. But to tell you the truth, I wouldn't have changed a thing. Although I'm sure my wife would have preferred to remain employed, I've really enjoyed having her around with me all day even if it meant she came down with a touch of cabin fever.
Tuesday, December 22, 2009
Sunday, December 6, 2009
Paint What Inspires You And Success Will Follow
One might think that painting what inspires you as an artist is a universal truth — that this is what motivates all artists. You'd be wrong.
In my years working as a full-time fine artist, I have been surprised by the number of artists I've met who think of their work in terms of product. They paint for "the market". The subject matter they paint, or draw, or sculpt is directed by their perception of art buying trends and interestingly, not a single one of the artists I've met who approach their work in this way have seen much success artistically or financially.
Painting for the market is a term you might hear on occasion and I see it often at some of the shows I attend. For example, an artist sees that another artist's western landscapes sold very well at a particular show, and the following year that artist brings a bunch of western landscapes — only to sell very few, or often not sell a single one.
This way of thinking about art (at least from an artist's perspective) is flawed. Being an artist and selling well is most often a long process of finding what it is that inspires you to paint and painting countless hours to develop your identity as an artist, while slowly gaining a following of loyal collectors. These are collectors who not only buy your work because they enjoy the subject matter, but because they connect with your work on an emotional level and appreciate you as an artist. It is through the relationships of an artist's collectors that the artist will find long-term success and these relationships can't be cultivated if the artist isn't true to what inspires them. Savvy art collectors are very good about noticing the subtleties that communicate an artist's intentions in their work; did the artist paint this subject because it inspired them, or did they paint it because they thought it would sell?
I paint western landscapes and wildlife because it's what I love. My paintings are romanticized versions of my experiences in the outdoors. I grew up in the west. My subjects are ones I'm intimately familiar with and I paint them because they inspire me. Fundamentally, I am a painter and I would be painting regardless of whether or not I could make a living doing it. I simply must paint. My subject matter is what I love to paint. I hope this comes through in my work and that people who enjoy my work can see this. I'm not concerned with financial success as much as I am artistic success (growing as an artist, and eventually producing work that moves myself and others). In the end, I believe that by staying true to what inspires me as an artist, success will eventually follow — both artistically and financially.
Thursday, November 19, 2009
More New Work

This small bison painting (12"x10") is one of several pieces I've just completed and am working on completing. This painting, and all of the new work I'll be finishing on over the coming months, will be posted to my web site...soon.
Wednesday, November 11, 2009
Lofty Heights

"Lofty Heights" is the title of my latest painting. It's basically finished but I will set it aside for a few weeks and then come back to it with fresh eyes and see if I feel it needs any adjustments.
Monday, October 26, 2009
The Crutch Of Photographic Reference
Representational artists today are fortunate to have such an extraordinary tool to use in creating works of art — the photograph. But for every benefit photography provides, it also yields great drawbacks. These include simple problems like inaccurate color representation, poor reproduction of values (especially in bright light) and photographic distortion — all of which are easily handled by the well-trained artist. But there are a few issues with using photographic reference that go much deeper than simply having to adjust a color here or a value there. Photo reference can make you lazy. Really lazy.
First, it's simply easier to reproduce a photo than it is to work directly from life. The reason is that the mind has to do much less work when taking a two-dimensional image (a photograph) and reproduce it again, two-dimensionally, on paper or canvas. In contrast, the mind has to work hard to convert three-dimensional reality onto a two-dimensional plain and still achieve the illusion of three-dimensional form. The conversion that has to occur when working from life and placing what you see through direct observation onto a two-dimensional plain like paper or canvas is an exceptionally complex skill that can take many, many years to perfect. It’s also a skill an artist must polish if he or she is to accurately correct those simpler problems like photographic distortion and exaggerated atmospheric depth inherent to reference photographs.
The second, and in my view most sinister problem with using photographic reference, is it can make the artist lazy in the way of concept. Working from photographic reference, especially for those artists that work with subject matter that requires the use of the camera (like us wildlife artists), one can easily be seduced into simply reproducing a good photo. So rather than developing a concept for a painting, then looking to one’s photo reference library to help one realize one’s concept, the artist simply looks for a photo that would make a good painting.
Does this mean that directly copying a photo is always lazy...no. I have seen many artists whose personal style is so unique that it would be difficult to even recognize the photographic reference they used. Also, in the case of doing portraits, photographic reference may be the only means of capturing a likeness, such as when working with young children. But for many artists, the photo can become a crutch for laggard conceptualizing — photographic reference’s most artistically corrosive drawback in my view. The artist must avoid becoming a slave to his or her photographs.
With this in mind, I’ve decided to post how it is I often work using photographic reference. My painting titled “Date Night” makes a fair example:
 I began with the idea of creating a nocturne painting with moose as the subject. I did several sketches that served to nail down the composition. I then went to my photo reference library to find images I could use to realize my concept. In the end, I used four different images to help me complete the painting.
 I first located the subject of my painting. In the case of these reference photos, they are reversed from the actual painting. If I'm really adamant about a painting's direction being a certain way—as was the case with "Date Night"— I'll draw everything in reverse from my reference (it also makes for a challenging drawing exercise).
 I used this bull moose for the cow in my painting. A few minor anatomical changes and poof! Female moose.
 This was my reference for the marsh and grasses. I often use reference like this photo as just a guide. You'll notice the actual grass in the painting is laid out much differently.
 And finally, I used this image for creating the tree and background mountains.
You may have noticed I had no reference for creating the nocturne itself. For this I looked to how other artists had handled painting night scenes and essentially flew by the seat of my pants (this is the first nocturne I've ever painted).
In locating images for use as reference, I try to keep a few things in mind...
1) Light sources.
I make sure the light source at least loosely matches from photo to photo.
2) Environment.
When building a painting where the environment will play an important roll, I try to make sure all of the reference I utilize is from the same geographic area. As an example, I don't want to be putting plants in a painting that wouldn't exist in that environment.
3) Integrity of the Concept.
I try to remember not to let the reference change the concept — which it can sometimes do if you're not careful.
Remember that it's called photographic reference for a reason. And most importantly, never let your photos limit your ideas.
Monday, October 12, 2009
Questions? See FAQ
I thought I'd take a moment to address several of the most commonly asked questions I get from artists and art enthusiasts regarding me and my work.
1. How long does it take you to complete a painting? (Boy, if I just had a nickel...)
Answer: Seldom am I actually able to give an accurate number to anyone that asks this question. Every painting is different. To quote Norman Rockwell, "Some come easy, some come hard." Also, a bulk of the time it takes to create a painting lies in developing a concept for it. If you began counting the minutes from the point I started working on an idea for a painting, to the finished work, several months may have passed. But, if you really must have an answer — addressing strictly the actual application of paint to canvas part of the process — it can take anywhere from a few hours for a very small painting, to a couple of weeks for a large work.
2. What paints, brushes and canvas do you use?
Answer: For a while I bounced back and forth between Windsor & Newton Artist Oil Colors and Holbien. I've now settled on Holbien. The reason being that of all of the brands of paints I've used, Holbien's quality is the most consistent out of the tube. There's never a teaspoon of oil expelled upon first squeezing a tube and their high level of pigmentation is very consistent. As for brushes, I use Windsor and Newton Lexington Series bristle flats. I've now switched to using linen canvas. The brands I'm currently using are a combination of linen panels made by SourceTek (Claessens #66) and stretched linen canvas (Centurion LX brand).
3. How do you price your artwork?
Pricing can be tricky at first. Some artists price paintings based on how they feel about them. Others take a more traditional and structured 'retail' approach. I suppose I'm somewhere in between but lean more towards 'traditional retail approach'. I've arrived at my pricing by comparing my work with other artists that I feel are of equal skill and work with similar subject matter, as well as artists that have been working professionally for about as long as I have. Doing this provided me a good baseline from which to price my own work. As one looks at my prices, they'll notice that smaller pieces, per square inch, are more expensive than larger pieces — the paintings become less expensive per square inch as they get larger. I keep all common sizes at the same price level. For example, you can expect to pay the same price for any of my paintings that are 11" x 14" — regardless of subject, time it took to complete, or how I feel about the piece. The only real fluctuation in the price would be influenced by the framing, but the base price for any particular size painting remains constant. Basically, I come up with the price, then add the cost of framing.
4. Who are your favorite artists?
Answer: That changes often. But here are some that have always stayed at the top of my list... Living: Bill Anton, Jeremy Lipking, Clyde Aspevig, Matt Smith, Mian Situ, Kathryn Stats, Scott Burdick & Susan Lyon, James Reynolds (to name just a few). Deceased: John Singer Sargent, Anders Zorn, Edger Payne, Carl Rungius, Frank Tenney Johnson (again, that's just some).
5. How tall are you?
6' 6"
If anyone would like me to add to the FAQ, just let me know.
Monday, October 5, 2009
The Magic Of Talent And The Reality Of Hard Work
I am sometimes confronted with the very well-meaning art observer who compliments me on my “great talent”. On the one hand, at its heart this is a sincere acknowledgement of appreciation for my work. It is meant as no more than a heart-felt compliment and I shouldn’t take it any other way. But on the other hand, I also find it to be a dismissal of the reality of being an artist. Let me explain...
The creation of art (and especially representational art) is somewhat of a mystery to those that feel their artistic faculties only allow them to appreciate art rather than create it. In many ways, this mystery is good for business. It effectively elevates the artist to a position of admiration which often translates into better sales. But the mystery of talent, to a large extent, can be revealed as simple determination, dedication and in the end, consistent hard work.
I fully understand that no matter the endeavor, there are those of us that will excel at any particular chosen task more so than others. Everything, from the environment in which we are raised, to the people we encounter along the way, right down to our DNA, will have a tremendous impact on how we excel at certain tasks. One need only look to athletics to see how the individual’s performance is influenced by these kinds of variables. But as with any undertaking, the effect of those variables must be tempered with perseverance and hard work. And there are few other categories in which this is truer than in art — and more specifically, representational painting.
I’ve spent my entire life drawing and painting. I am constantly trying to refine and better my skills as an artist, both fundamentally and stylistically. It’s tireless, frustrating, difficult work and I do it nearly every day of my life. My dedication to being better at what I truly love to do has gifted me tangible results. I can look back on my previous work and see great changes for the better. I can see dramatic improvements in all aspects of my work — improvements that are obvious when I look back even just a few years. In other words, I didn’t spring from the womb being able to draw and paint. In fact, I would argue that anyone could learn to draw and paint realistically. Essentially, it comes down to simple eye-hand coordination and there are a set of very effective techniques and principles one can learn that will help them to achieve that end. I can think of a couple artists who I have personally observed go from 8th grade-level competency in drawing, to truly professional quality, and their betterment can easily be explained by their dedication to constantly practicing — not by supernatural forces.
It isn’t in a person’s technical ability to recreate on paper or canvas what they see that I consider talent. And, since one’s style (and the public’s appreciation for it) is a relatively subjective thing in art, talent can’t necessarily be gauged by personal style alone. If talent in art truly exists, it can be found in the artist’s level of commitment to bettering themselves as an artist, and maybe more importantly, in their love of creating art.
Don’t let your (or anyone else's) preconceived notions about “talent” stand in the way of you becoming a better artist.
Monday, September 28, 2009
Rocky Mountain National Park 2009
I've returned. And although I wasn't able to do everything I’d hoped, I still had an exciting (and productive) time and I'm itching to begin new work. I miss the mountains already.
Day 1: Traveling
The car was loaded. All systems were go. My wife and I left Phoenix, Arizona for the mountains of Colorado at 6:30am — bright-eyed and bushy-tailed (well maybe not bushy-tailed).

This 12 1/2 hour trek to our first destination, Georgetown, CO, is one of the most extraordinarily scenic drives I've ever been on. It took us through the deserts of Arizona,

through Monument Valley and Moab, Utah and finally into the heart of the Colorado Rocky Mountains — all in a long day's drive.

I stopped along the way to take a few photographs of an antelope, and some of the landscape we traveled through.

We arrived in Georgetown, CO at about 7:30pm local time. Georgetown is just a short drive from our first stop, Mt. Evans. The plan was to rise early and get to Mt. Evans to photograph mountain goats and bighorn sheep, and do a little plein air painting...that was the plan anyway.
Day 2: Disappointment
We awoke to rain and a rather disappointing weather forecast. A cold front had moved through Colorado in the night and an associated low-pressure system had stalled over western Nebraska. The forecast had changed from sunny skies for the duration of my trip just two days before, to clouds, rain and snow for the next three days. Bummer.
My wife and I still attempted to go up Mt. Evans, but the heavy fog and slick conditions forced us to turn back just a couple miles into the drive. We decided we would head to Rocky Mountain National Park and return to Mt. Evans later in the trip once the weather had cleared. The next day it was announced that the road up Mt. Evans had been closed for the winter. Again...bummer.

Luckily, there were late afternoon breaks in the clouds and I was able to photograph elk in RMNP. I was still disappointed about the idea of losing three days of painting and photographing but I felt a little better knowing the sun may make a few appearances over the next several days.
Day 3: Things Go From Disappointing To Very Disappointing
We spent the night with my wife’s cousins in Greeley, CO (about an hour east of RMNP). Again, we awoke to rain. Only now the forecast was calling for as much as 16” of snow in the mountains. A winter storm warning had been issued, blizzard conditions were expected and I was beginning to think we may not be able to enter RMNP the next day. We did spend the day in the park. I photographed more elk, but the poor light and off-again, on-again rain and snow kept me from painting.
Later that afternoon, Yvonne’s bother and sister-in-law arrived from Nebraska to join us for a few days. We had a nice dinner and fully expected to be snowed in the next morning.
I finally had some time to look through the photos I’d taken. It was then I realized that the image stabilizer on my lens was off and many of the images I’d thus far shot were blurry, some too blurry to be used as reference. Again...bummer.
Day 4: Things Begin Looking...Better

Not a single flake had fallen overnight (at least not in the lower elevations of the park). I woke up early and headed out to RMNP by myself. There wasn’t much happening and the poor light conditions kept me from taking too many photographs. I returned to the hotel in Estes just as everyone was waking. Once all were up, showered and dressed, we spent a couple hours driving through the park and hiking around Bear Lake.

We had a late lunch and returned to the park to take some evening photographs as the sun did manage to peek through the clouds on occasion. Although I didn’t paint at all, or photograph as much as I’d liked to, it was enjoyable spending the time with family and that certainly helped to alleviate some of my disappointment in the weather.
Day 5: Weather Begins To Clear, But There’s Another Small Problem...

I decided I was going to paint rain or shine. I left early in the morning and set up my easel in a very nice location in Beaver Meadows. Cloudy skies prevailed again this morning, but it was atmospheric and the subtle shifts in value made for a challenging plein air painting session. As a side note, while I was getting my painting gear from the car, a curious coyote walked up behind me. I didn’t notice until a photographer told me to turn around. The coyote was standing about 5 feet from me. We looked at each other, he decided I wasn’t going to offer a treat as I’m sure many of the Park’s visitors do, and he went on his merry way.

The painting went relatively smoothly, and I was even joined by another painter who was far more ambitious than I — he set up to paint what had to be at least an 18"x 24" canvas.
After finishing the painting, I began to notice a problem...I was developing a cold.
I returned to the hotel in Estes and once we'd finished eating a late breakfast, the skies began to clear. We toured the park again, I photographed more elk, and we hiked to Dream Lake where I decided to paint. It was there I was reminded of how quickly conditions can change in the mountains. During the course of my painting, it rained, snowed, cleared to sunny skies, and then snowed again. Needless to say, I gave up on the painting, but definitely enjoyed the fun in trying to complete it in such fickle weather.


By that evening, my cold was in full swing. Sore throat, runny nose, congestion, the works.
Day 6: Great Weather, Bad Cold
My wife’s brother and sister-in-law left early. Yvonne and I spent the morning packing up our goods and loading the car as we intended on returning to Greeley that evening to stay with her cousins again. After checking out of the hotel, we entered RMNP once again to photograph and paint.
It was during the early photographing that I ran into fellow artist, Sonya Reid who appeared to be enjoying the elk, as so many were. The good weather had brought in many more visitors and there were “elk jams” on every road in the park.

I felt it was a good time to find a secluded spot and do some painting again. Yvonne and I stopped at the Storm Pass trailhead, I set up to paint, and she hiked to Bierstadt Lake.

We spent the evening watching and photographing the elk, and by this time, Yvonne had also developed a cold. When we left the park that evening, we decided we would begin the long drive home — cutting our trip short by two days. With both of us suffering from colds, and there being no opportunity to drive up Mt. Evans, I felt that I had what I needed to start some new work so leaving early and splitting up the long drive into two days sounded better than dealing with the crowds and trying to hike while sick. We both really just wanted to be back in our own bed.
Day 7: The Return Home
We had spent 4 hours on the road the previous night, stayed in a hotel just a bit outside of Grand Junction, Colorado and slept in before attacking the final leg of our drive back to Gilbert, Arizona. We didn’t stop but for gas and bathroom breaks. It was really nice to be back in our own bed that night. My cold got better just thinking about it.
All-in-all, and as surprising as it may seem, we both had a great time. I did get a lot of useful reference material and I’m excited to begin formulating new paintings. In fact, I think I’ll start right now.
Day 1: Traveling
The car was loaded. All systems were go. My wife and I left Phoenix, Arizona for the mountains of Colorado at 6:30am — bright-eyed and bushy-tailed (well maybe not bushy-tailed).

Yvonne enjoying the ride
This 12 1/2 hour trek to our first destination, Georgetown, CO, is one of the most extraordinarily scenic drives I've ever been on. It took us through the deserts of Arizona,

The desert just north of Phoenix, Arizona
through Monument Valley and Moab, Utah and finally into the heart of the Colorado Rocky Mountains — all in a long day's drive.

Just outside of Monument Valley
I stopped along the way to take a few photographs of an antelope, and some of the landscape we traveled through.

This was the location Yvonne and I spotted the antelope
We arrived in Georgetown, CO at about 7:30pm local time. Georgetown is just a short drive from our first stop, Mt. Evans. The plan was to rise early and get to Mt. Evans to photograph mountain goats and bighorn sheep, and do a little plein air painting...that was the plan anyway.
Day 2: Disappointment
We awoke to rain and a rather disappointing weather forecast. A cold front had moved through Colorado in the night and an associated low-pressure system had stalled over western Nebraska. The forecast had changed from sunny skies for the duration of my trip just two days before, to clouds, rain and snow for the next three days. Bummer.
My wife and I still attempted to go up Mt. Evans, but the heavy fog and slick conditions forced us to turn back just a couple miles into the drive. We decided we would head to Rocky Mountain National Park and return to Mt. Evans later in the trip once the weather had cleared. The next day it was announced that the road up Mt. Evans had been closed for the winter. Again...bummer.

One of the many bull elk we saw that day
Luckily, there were late afternoon breaks in the clouds and I was able to photograph elk in RMNP. I was still disappointed about the idea of losing three days of painting and photographing but I felt a little better knowing the sun may make a few appearances over the next several days.
Day 3: Things Go From Disappointing To Very Disappointing
We spent the night with my wife’s cousins in Greeley, CO (about an hour east of RMNP). Again, we awoke to rain. Only now the forecast was calling for as much as 16” of snow in the mountains. A winter storm warning had been issued, blizzard conditions were expected and I was beginning to think we may not be able to enter RMNP the next day. We did spend the day in the park. I photographed more elk, but the poor light and off-again, on-again rain and snow kept me from painting.
Later that afternoon, Yvonne’s bother and sister-in-law arrived from Nebraska to join us for a few days. We had a nice dinner and fully expected to be snowed in the next morning.
I finally had some time to look through the photos I’d taken. It was then I realized that the image stabilizer on my lens was off and many of the images I’d thus far shot were blurry, some too blurry to be used as reference. Again...bummer.
Day 4: Things Begin Looking...Better

My wife's brother, Rick and his wife, Mary enjoying the hike around Bear Lake
Not a single flake had fallen overnight (at least not in the lower elevations of the park). I woke up early and headed out to RMNP by myself. There wasn’t much happening and the poor light conditions kept me from taking too many photographs. I returned to the hotel in Estes just as everyone was waking. Once all were up, showered and dressed, we spent a couple hours driving through the park and hiking around Bear Lake.

Rick, Yvonne and myself
We had a late lunch and returned to the park to take some evening photographs as the sun did manage to peek through the clouds on occasion. Although I didn’t paint at all, or photograph as much as I’d liked to, it was enjoyable spending the time with family and that certainly helped to alleviate some of my disappointment in the weather.
Day 5: Weather Begins To Clear, But There’s Another Small Problem...

The view from the location I painted in Beaver Meadows
I decided I was going to paint rain or shine. I left early in the morning and set up my easel in a very nice location in Beaver Meadows. Cloudy skies prevailed again this morning, but it was atmospheric and the subtle shifts in value made for a challenging plein air painting session. As a side note, while I was getting my painting gear from the car, a curious coyote walked up behind me. I didn’t notice until a photographer told me to turn around. The coyote was standing about 5 feet from me. We looked at each other, he decided I wasn’t going to offer a treat as I’m sure many of the Park’s visitors do, and he went on his merry way.

My completed painting
The painting went relatively smoothly, and I was even joined by another painter who was far more ambitious than I — he set up to paint what had to be at least an 18"x 24" canvas.
After finishing the painting, I began to notice a problem...I was developing a cold.
I returned to the hotel in Estes and once we'd finished eating a late breakfast, the skies began to clear. We toured the park again, I photographed more elk, and we hiked to Dream Lake where I decided to paint. It was there I was reminded of how quickly conditions can change in the mountains. During the course of my painting, it rained, snowed, cleared to sunny skies, and then snowed again. Needless to say, I gave up on the painting, but definitely enjoyed the fun in trying to complete it in such fickle weather.

Dream Lake — sunny

Dream Lake — snowy ( just about 15 minutes between photos)
By that evening, my cold was in full swing. Sore throat, runny nose, congestion, the works.
Day 6: Great Weather, Bad Cold
My wife’s brother and sister-in-law left early. Yvonne and I spent the morning packing up our goods and loading the car as we intended on returning to Greeley that evening to stay with her cousins again. After checking out of the hotel, we entered RMNP once again to photograph and paint.
It was during the early photographing that I ran into fellow artist, Sonya Reid who appeared to be enjoying the elk, as so many were. The good weather had brought in many more visitors and there were “elk jams” on every road in the park.

My completed painting from Storm Pass trailhead
I felt it was a good time to find a secluded spot and do some painting again. Yvonne and I stopped at the Storm Pass trailhead, I set up to paint, and she hiked to Bierstadt Lake.

The view from the trail leading to Bierstadt Lake, courtesy of Yvonne
We spent the evening watching and photographing the elk, and by this time, Yvonne had also developed a cold. When we left the park that evening, we decided we would begin the long drive home — cutting our trip short by two days. With both of us suffering from colds, and there being no opportunity to drive up Mt. Evans, I felt that I had what I needed to start some new work so leaving early and splitting up the long drive into two days sounded better than dealing with the crowds and trying to hike while sick. We both really just wanted to be back in our own bed.
Day 7: The Return Home
We had spent 4 hours on the road the previous night, stayed in a hotel just a bit outside of Grand Junction, Colorado and slept in before attacking the final leg of our drive back to Gilbert, Arizona. We didn’t stop but for gas and bathroom breaks. It was really nice to be back in our own bed that night. My cold got better just thinking about it.
All-in-all, and as surprising as it may seem, we both had a great time. I did get a lot of useful reference material and I’m excited to begin formulating new paintings. In fact, I think I’ll start right now.
Monday, September 7, 2009
Time For A Recharge
My "artist batteries" are running on low. I've got the twitch. You know, that involuntary twitch we artists get when we've been out of direct contact with what inspires us for too long. My wife has forbade me from handling cutlery until the twitch has been settled — my batteries recharged.
For me, this means returning to the high places of the Rocky Mountains — painting en plein air, photographing, hiking and basically immersing myself in all that the mountains of the west have to offer. The Rockies are my muse, my inspiration. They are what move me to paint.
In just short of two weeks, I will leave the heat of the desert southwest and head to Rocky Mountain National Park to spend a week doing exactly what I need to do to fill my artistic reservoir... once again. And although this particular trip is somewhat of a consolation prize (my wife and I were going to spend two weeks in Glacier NP and the Grand Tetons until she was laid off from her job just a few weeks ago), I am no less excited to get out and get inspired.
I will be sure to post some of the highlights from this trip when I return.
Saturday, July 25, 2009
Artist Turned Carpenter
Well, that's probably a stretch. But for the first time in my career, I built a crate for shipping a painting. In fact, I built two crates. These two crates will be used to ship my painting and drawing to the NMWA in Jackson, WY for the Western Visions Show & Sale.
Typically, I use Strongbox Art Shippers to send my paintings, but this year the museum was very adamant that participating artists ship their work in crates. I'm not one to argue, so what the museum wants, the museum gets.
Since this was my first time building art crates, I did a wee bit of research and made sure to enlist my dad for not only his extensive reservoir of tools, but also his help in constructing the crates.
Note to self: Make sure to build crates before the middle of summer. It was 114° F the day we built the crates in my dad's garage — with no air conditioning.
Although building the crates certainly took some time (about two hours), it cost less than purchasing the two Strongboxes I would have needed; about $20 less. Here's a list of the supplies I picked up at my local Home Depot and Jo-Ann Fabrics & Crafts:
2 8ft lengths of 1x4" pine boards
1 4x8' sheet of 1/8" luan mahogany (door skin)
1 box of 1 1/4" gold screws
2 cabinet handles
2 24x60x1" foam sheets (these I purchased at Jo-Ann Fabrics)
The finished art crates measure 23x20x3 1/2" interior dimensions. This allowed for about 2" of foam all the way around the framed painting and drawing.
After cutting all of the boards and luan panels to the sizes I needed, it was just a simple matter of assembling them. We (my dad and I) started by joining two 1x4" boards (a 24 1/2" length and a 20" length) by putting two screws in the corner joint. We repeated this until the entire frame was assembled. We then cut triangles out of the scrap laun panel to place in each corner of the crate for added durability and strength and then screwed all of the triangles and a 24 1/2 x 21 1/2" luan panel to one side of the wood frame. Finally, we added a cabinet handle to the top of each crate.
I then cut 6 pieces of 23x20x1" foam sheets — 3 for each crate. I laid a single foam sheet into each crate then cut a hole in the two middle sheets to match the exact exterior dimensions of the frame for both the painting and the drawing. I then laid these pieces of foam into each crate and placed the painting and drawing into their respective crates directly into the hole cut in the center of the foam. The final sheets of foam went on top and then I placed the final laun panels and corner triangles on the crates and screwed them down.
Once I'd completely assembled the crates with the painting and drawing inside, I stenciled my last name and the words "fragile" and "up" with an arrow to the crates. I placed Duct Tape over the corner pieces on each crate to help keep them from catching on things during shipping.
Here's a photo of one of the final crates.

Thursday, July 23, 2009
A Drawing For Western Visions
For this year's Western Visions Show & Sale at the National Museum of Wildlife Art—in addition to the painting I'm sending—I am also submitting a drawing. The museum has added a 'Sketches' component to the show and has invited all of the participating artists to submit a drawing or sketch if they wish. So, here's mine.

Wednesday, July 15, 2009
The Art of Commissions
I have very strict rules when doing a commission — which is why I accept so few of them. An innocent commission can easily deteriorate into the artist being used as a tool for the buyer to create the painting they want. That isn't fine art, at least not in the business sense. That's illustration — being paid to create art that illustrates a buyer's concept. I don't do that and it's important to me that any potential buyer understand my perspective before they engage in commissioning a painting from me.
My rules are simple, the buyer has a say in subject matter and size. That's all. I determine everything else. I'm sometimes flexible on time frames (when a painting might be completed) but for the most part, I work on a particular painting when I have a strong concept for one, and that may take time.
This brings me to a situation regarding a painting I recently completed. It illustrates the best in artist/patron relationships...
A collector of mine contacted me and inquired about whether I had any pieces she might be interested in as she was looking to add a painting to her collection. She did have a set of parameters for the painting that, unfortunately, none of my available work met.
I mentioned to her that I did have an idea for a painting I thought she might be interested in (based on our conversation) and said I could start it immediately if she wished. As a collector, and a well-seasoned art lover, she understood that if the buyer is allowed to dictate too much to the artist as to what they want, often the painting produced suffers from it. She felt, as I do, that the best work is produced when the artist can do as he or she sees fit. With her feelings on the matter communicated, she encouraged me to start the piece right away.
She bought the painting. In fact, she purchased it after seeing it only partially complete.
Technically, I suppose this isn't actually a commission. But, the process with this particular collector was just how I like my commissioned work to go; with no particular expectations from either the buyer or myself other than to produce the best work I can.
Here’s the painting titled, "High and Mighty".

Thursday, July 9, 2009
Did A Little Drawing

I decided to take a break from painting and just "veg-out" on a small drawing. Shifting gears and working on a drawing is one way I like to relax and break from painting.
Monday, July 6, 2009
Rejection: Update
Coincidentally, I just today received another rejection letter from a show I applied for. See, happens all the time.
Rejection
An artist friend of mine was recently rejected from a show he'd participated in for the last couple of years. I think he was actually a bit down about it (as any of us would be) and felt as though his not being invited back was somewhat of a setback in his career. I don't feel that way — at least, most of the time I've been rejected.
I can't tell you how many times I've been rejected from participating in art shows, art competitions, etc. The list is long and painful. In fact, the show of which my friend was just "uninvited" from is a show I have been rejected by 3 times. I still have yet to be invited (though that hasn't stopped me from trying, again, and again, and again, and again...do you see a pattern here?)
Rejection is an often difficult, horse-sized pill to swallow, especially when it comes to us by way of our creative endeavors — something many of us are emotionally invested in. But in the scope of one's career, as an artist, rejection can be made a positive. It can often refocus our efforts and allow us to step back from our work and view it from a more objective point-of-view. If you can accept rejection as a motivator to improve your work and not as a step back in your career, you’ll likely get where it is you want to be faster and with fewer bumps. At least, that’s what I keep telling myself.
Keep painting. Be persistent. And try to not let rejection dampen your enjoyment of what it is you do.
Thursday, April 16, 2009
My Process: Part 2
Well, finally I'm posting something about this large painting I'm demonstrating. So, here goes...
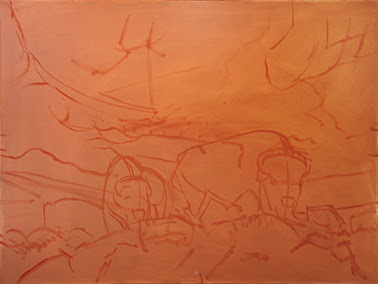 I begin by mixing the same "rust" color I used to tone the canvas - a mixture of equal parts cadmium yellow light, alizarin crimson and a dab of ultramarine blue. I used this mixture, in combination with a small stiff bristle brush, to draw out the composition. As you can see, I don't make a detailed drawing. In fact, it isn't much more detailed than the rough sketch. I am only concerned with getting the most important landmarks of the composition placed and establishing a general guide for spatial and size relationships. This took about 15 minutes.
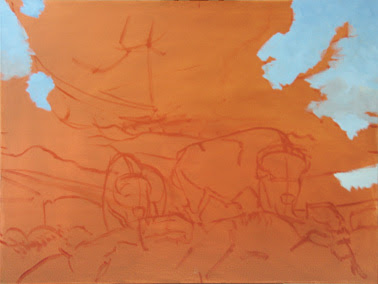 Once the drawing is finished, I then begin blocking in color. As a generalization, I work background to foreground, top to bottom. This isn't always the case, but for the most part it is how I tend to work. Here I've started blocking in the sky using a mixture of cerulean blue, a little ultramarine blue and a dab of alizarin crimson and cadmium yellow light to gray it down just a bit. I then lay in the color, mixing a bit more titanium white with it as I move down the painting.
To create interest in areas (like the sky) where there are large blocks of flat color, I really like to emphasize my brush strokes, varying the direction and length of them while being careful not to blend them out. This will create a textural quality that adds interest to an otherwise flat area of color. Also, I tend to try and paint as thickly as I can. This serves three purposes; first, when the piece is finished, the thick paint creates a jewel like quality when lighted. Second, the clarity of my colors and definition of my brush strokes are more apparent with the thicker paint. And finally, the thick paint allows me to ‘sculpt’ in a way, creating a 3-dimensional surface quality that helps to strengthen the appearance of depth in the painting.
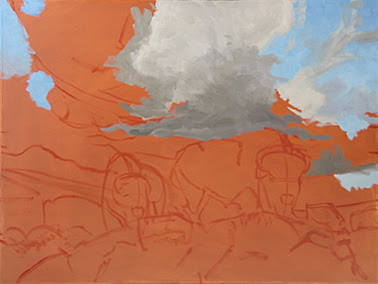 Here I have began blocking in the clouds. As the large foreground cloud goes darker (towards the base of the thunderhead) my color goes more purple, as I move to lighter areas of the cloud, my color goes more yellow. I never use straight white. I always mix it with something depending on what I want the color temperature of my light area's to be — in this case, the light areas of the clouds will be a mixture of cadmium yellow light and titanium white (warm). This mixture is applied to the brightest parts of my foreground clouds. As the clouds move further back on the horizon, I will paint the highlights of those clouds using more alizarin crimson. I will also gray them down a bit so that the difference between their highlights and their shadows is diminished. This will help to create atmospheric depth.
My brush strokes in the cloud are still apparent but I do blend them out slightly more than I do in the flat areas of the sky. This helps to soften the cloud and create contrast of texture between the clouds and the sky.
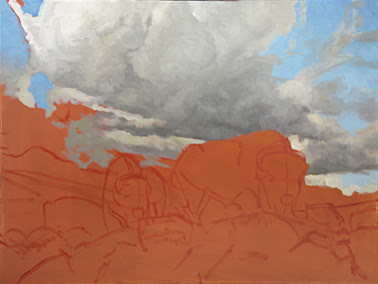 At this stage I am continuing to do what I have been — blocking in color. As the cloud begins to take shape, I also begin adding more subtlety of value.
NOTE: If you've never worked with a brightly toned canvas, it's important to consider that you may need to mix and compare colors on your palette and not on your canvas. The bright color will throw off your perception of any particular color's accuracy. So I would recommend getting your color correct on your pallet by comparing it with the other colors on your palette before putting it on the canvas. If its value and hue are correct on your palette, it will be correct on your canvas — even if it doesn't look accurate at first when placed against the brightly toned canvas.
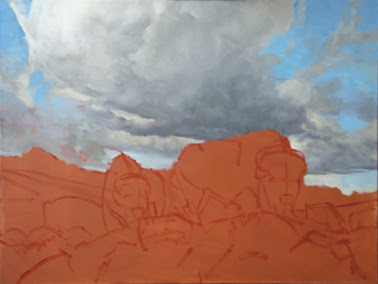 At this point, the sky is a little over halfway finished. I will continue to add subtle changes in value in the clouds as well as finish filling in the areas of the sky still absent of color. Once I complete the sky, I will let it dry before moving on to the foreground elements.
Up to the point of this last image, I've been working for about 6 hours. I've used only 2 brushes — a number 12 bristle flat and a number 10 bristle flat. Also, because Holbein paints come out of the tube slightly more stiff than I like, I mix a very small amount of liquin with each color — just enough to get the paint to flow a little better when applied to the canvas.
If you have any questions about this part of the demonstration, just post them here. I'll answer them as soon as I can.
I hope you've enjoyed the second part of my demonstration. I'll post the third part following this weekend.
Tuesday, April 14, 2009
Western Visions Show Painting

Well, here it is... my currently untitled painting for the National Museum of Wildlife Art's Western Visions Show and Sale.
I've included two close-ups of the painting to illustrate certain attributes of my work that I constantly fight to nurture. Although this small JPEG may make the painting appear relatively detailed, the actual work is not.


It is a goal of mine to "tell the story" with as few stokes as possible — to create an illusion of detail without actually painting every detail. I'm a firm believer that this approach not only encourages the development of personal style (something I've mentioned often on this blog), but that it is also a profoundly difficult technique to master.
I realized early on that my paintings lacked elements I loved about work by other artists I admired. The absence of brushwork, paint texture, and the playing of edges in my earlier paintings all became more and more apparent as I stood back and tried to see my work from a more objective point of view.
This has led me to the idea that every stoke should be a small painting unto itself; that the painting surface should have dimension, a sculptural quality that adds actual depth to the work. And finally, that edges should be carefully considered and softened or strengthened wherever they best suite the design of the painting.
These ideas are obviously nothing new, and I certainly didn’t come up with them. But they are concepts I originally ignored and now realize the benefit of. For those of you, like me, who have an innate compulsion to produce detailed work, you understand how difficult it can be just to overcome that compulsion and paint more loosely (let alone to actually be good at it). It is a struggle I’m really enjoying and maybe even beginning to overcome.
I don’t know if this painting is a good piece of art or not — that’s for you all to decide — but I do feel that with it I have achieved some level of success in creating those qualities that I find so appealing in painting.
I hope you all like it!
Friday, April 10, 2009
Sorry for the Delay
I realize some of you are waiting for me to post more about the large painting I'm demonstrating, but, deadlines called and I had to switch gears and begin work on a couple of pieces for the National Museum of Wildlife Art's Western Visions show. I will get back to working on the demonstration piece very soon and I hope to post more of the demo in the very near future.
The paintings (and this year, a drawing as well) which I create for this museum show, I truly labor over. That's not to say I don't with all of my work, but in the case of this particular show, I like to take my time and really focus on developing a strong concept and be meticulous about creating a painting that clearly communicates those attributes of my work that make it uniquely mine. I feel doing this results in the best possible painting for this show.
The museum has been extraordinarily good to me and it is a tremendous honor to have my work included in a show with the likes of Clyde Aspevig, Bill Anton, Tucker Smith, Morgan Weistling, Mian Situ, Z.S. Liang and so, so, so many others. It goes without saying that the quality of work at this show is tremendous motivation for producing my best — which is partly why I spend so much time on such a small painting (it’s a miniatures show). It’s important to me that not only I be proud to submit the painting to the museum — and also feel it can stand on its own among such an array of great pieces — but that the museum be proud to present it to their patrons and the general viewing public.
Yes, I do feel a lot of pressure in creating this painting, but I’ve often produced some of my best work under great pressure. Pressure isn’t necessarily a bad thing for me.
In a few days, when the painting is dry enough to scan, I’ll post it here.
Well, back to work.
Tuesday, March 17, 2009
My Process
And so begins a new painting. In starting this latest work, I thought I'd post a little about my process. As I mentioned in an earlier entry, I typically begin with rough, thumbnail sketches. Sometimes these sketches are extremely loose — massing out only the most basic shapes and value structure — and sometimes they are more finished. In the case of this latest painting (which I am tentatively titling "Rolling Thunder"), the thumbnail sketch I've decided on would qualify as just a notch above rough (at least for me).
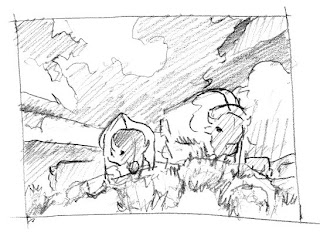
If this sketch is a little too rough for you to make out what is going on, well you're not alone. So to help clear it up a bit; it's a painting of several American Bison standing on a hill, big thunderhead above, sage, grass and rock below. (That's the best I can do, you're just going to have to wait for the 'in progress' painting images I'll be uploading.)
From this point, I collect the reference I will need to begin work on the painting. Here are a few of the images I'll be working from. They were shot in Custer State Park, South Dakota — one of the best places I've ever been to gather reference of bison and pronghorn antelope.
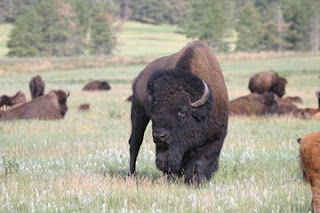
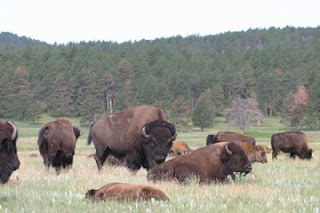
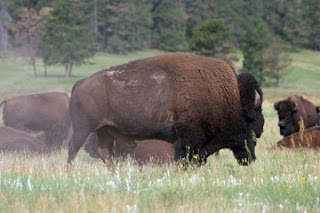
Just in case you're wondering, I use Holbein Artists' Oil Colors, Windsor & Newton Lexington II Flats and Rounds (for this painting, the largest sizes they make), and I'll be painting on 48"x36" stretched linen. Because I’m starting with unprimed linen, I’ll be coating it with four layers of gesso (two coats brushed on vertically, and two coats brushed on horizontally). I coat the linen once in the morning, then again in the evening, and then repeat that process the next day. Once I've finished coating the canvas with gesso (if it needs to be coated at all), I'll let it dry for at least 24 hours before toning it.
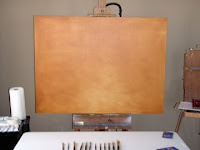 I tone my canvas using a rust color mixed from equal parts Alizarin Crimson, Cadmium Yellow Light, and a dab of Ultramarine Blue (I've already completed toning this substraight). This mixture was thinned using Liquin and applied to the entire surface of the linen. I then rub the entire surface with a paper towel to remove excess paint. I typically let the canvas dry for one day before I begin painting. In this case, it's been drying...for a while.
Please return frequently as I’ll be posting lots of ‘in progress’ shots and I’ll discuss the whys-and-hows of what I’m doing.

If this sketch is a little too rough for you to make out what is going on, well you're not alone. So to help clear it up a bit; it's a painting of several American Bison standing on a hill, big thunderhead above, sage, grass and rock below. (That's the best I can do, you're just going to have to wait for the 'in progress' painting images I'll be uploading.)
From this point, I collect the reference I will need to begin work on the painting. Here are a few of the images I'll be working from. They were shot in Custer State Park, South Dakota — one of the best places I've ever been to gather reference of bison and pronghorn antelope.


Just in case you're wondering, I use Holbein Artists' Oil Colors, Windsor & Newton Lexington II Flats and Rounds (for this painting, the largest sizes they make), and I'll be painting on 48"x36" stretched linen. Because I’m starting with unprimed linen, I’ll be coating it with four layers of gesso (two coats brushed on vertically, and two coats brushed on horizontally). I coat the linen once in the morning, then again in the evening, and then repeat that process the next day. Once I've finished coating the canvas with gesso (if it needs to be coated at all), I'll let it dry for at least 24 hours before toning it.
 I tone my canvas using a rust color mixed from equal parts Alizarin Crimson, Cadmium Yellow Light, and a dab of Ultramarine Blue (I've already completed toning this substraight). This mixture was thinned using Liquin and applied to the entire surface of the linen. I then rub the entire surface with a paper towel to remove excess paint. I typically let the canvas dry for one day before I begin painting. In this case, it's been drying...for a while.
Please return frequently as I’ll be posting lots of ‘in progress’ shots and I’ll discuss the whys-and-hows of what I’m doing.
Tuesday, March 3, 2009
The Inferiority Complex: Smash It With A Blunt, Heavy Mental Object
Have you ever looked at another artist's work and felt utterly incompetent? Ever compared your work to another's and wondered why you even bother to draw, paint or engage in any creative endeavor? I have. Especially early on in my career.
I keep a long mental list of artists whose work I find so astounding, so completely disarming, so moving in every aspect that I've often wondered why I feel remotely qualified to pick up a brush, a pencil or any other tool that might tempt me to create. I won't name those artists here for fear you may look them up and realize, yes, Dustin is a hack. Instead, I mention this only to remind you (and myself) that at some point, most artists do feel inadequate in their artistic endeavors (at least nearly all of the artists I've spoken with on the subject), and this is especially true if we wrongly measure the merits of our work against others who's work we admire.
Having now been a full-time artist for 8 years (really not that long, I know), I understand that success comes in many, many forms, and sometimes we as artists are unable to see success in our own work — especially if we are constantly comparing our work to others. I realized that if I can look back on the body of work I've created and see tangible improvement — improvement in draftsmanship, improvement in fundamental artistic principles, and most importantly, improvement in defining my own personal artistic style — then that is success.
Comparing one’s own work to the work of other artists can certainly play an important role in learning and growing as an artist. I’ve often found there is no better teacher than in studying the work of other artists. But remember, don’t measure your success as an artist against theirs. It’s a dangerous place to be mentally and will do nothing but stifle your artistic growth.
Smash those feelings of inadequacy with a big mental hammer and get back to enjoying what ever it is you’re creating!
Monday, February 23, 2009
What's the Big Idea?
My canvas has been prepared. It's now ready for paint. But what to paint?
It is this part of the process that can often be the most frustrating and the most enjoyable — creating a concept.
I've occasionally been asked; From where do I obtain ideas for my paintings? There is no simple answer for this. As a generalization, most of my concepts are inspired by experiences in the field. They are often the end result of combining field studies, photographic reference and sketches to create romanticized versions of the experiences I've had while exploring the vast wilds of North America.
Unfortunately, the ideas sometimes don't come as easily as that explanation might lead one to believe. For me, good art must go beyond subject matter. It should also represent the artist. It must not only communicate the artist's conceptual intentions, but must also give the viewer a glimpse into the artist's personality. The subtleties of brush work, color usage, design, etc., are all important attributes of a painting that help to define the artist. It's for this reason that I'm not interested in creating photorealistic work. Although photorealism demonstrates a great capacity for draftsmanship, I feel it also often renders the artist right out of their own work — reducing the uniqueness of their paintings to literal (and frequently, generic) representations of the artist's photographic reference.
This is partly why the 'Big Ideas' can be hard to come by. I'm not personally interested in just reproducing photos I’ve taken. My process begins with rough sketches (thumbnail drawings) that flesh out the idea. I often complete dozens of these thumbnails, especially when my intention is to create a complex composition, and I then look to my reference to help me bring the concept to life. Even though it is an experience that may inspire a painting, there is much more work to be done to create a painting that might be considered art — and more importantly, art that is uniquely my own. That is what I hope to do with this first canvas in my new series of works.
So, what is going to be my 'Big Idea'? I don't yet have an answer. It may take me a while to create a concept I know will keep me motivated throughout the painting process, which is especially important when doing a piece this large. But once I have it, I'll certainly post it here.
Wednesday, February 18, 2009
Time for Action
As an artist, I’m seldom satisfied with a painting I've completed.
Let me correct that; I am never satisfied with a painting I've completed. There is always some aspect of the finished work that irritates my often too critical artist sensibilities — like a nagging itch in the center of my back that I can’t quite scratch. This lack of satisfaction is a major driving force in my compulsion to create. In a way, I am constantly chasing the dangling carrot in hopes I might someday catch it. I'm OK with this. I've learned to not let my mild disappoint with certain aspects of my paintings diminish the accomplishment of them. Every painting is a lesson learned. With every painting I feel I've grown as a painter and matured in some small way. And I believe I am a better artist because of my self-criticism of my work.
But (and there's often a 'but') being a professional artist means having to meet deadlines. These deadlines frequently leave me feeling rushed in my painting, unable to address problems I see in the work because I have to move on to the next. This pressure can exacerbate the problem of self-criticism and can rob me of my motivation to create.
So now it is time for action.
I recently completed 12 paintings over the last several months for my show in Charleston, SC and I certainly felt rushed. That isn’t to say I was disappointed in the work, but I did feel I could have produced better paintings had I been able to truely give each piece the attention it needed. Now that the show is over, I can focus.
Over the coming months I plan to produce a series of paintings I can really concentrate on. There are no deadlines for these works. I am creating them for the purposes of recharging my love of painting, creating the best works I am currently capable of, and if all goes well, I will present them to a gallery I have long admired in hopes they may decide to show them.
I will post 'in progress' images of these paintings, along with a few notes on how I feel about them, here on this blog. I invite all of you to comment on them. I would appreciate your feedback.
SEWE
I wanted to thank all those that came out in support of the artists and the Southeastern Wildlife Expo in Charleston, SC. I had a great time and thoroughly enjoyed meeting the art lovers, seeing old friends, and selling a few paintings.
What the Blog?
You may be asking; why would you start a blog? I'm asking myself that very same question. In some ways it seems a bit cliché, and I certainly could find better uses for my time. But I realize that there are a number of you out there (how very small that number may be) who are, for whatever reason, actually interested in what I'm doing and what I have to say. This blog will give me an opportunity to keep those of you interested in my work and my career, better up-to-date.
I'll use this blog to post my thoughts on art, life and anything else I feel the need to vent about. It will also provide me a forum for showcasing paintings in progress and my latest works, cover recent events and connect with others.
I hope those of you who read my blog find it enjoyable and I look forward to any responses you feel compelled to post.
Subscribe to:
Posts (Atom)
